
How to Build a Ski Press Heater Using a PID Controller and Heat Blanket
A heated ski press makes a huge difference in epoxy curing. It allows you to speed up cure times and ensures a strong bond between layers. This guide walks through building a PID-controlled heating system for your press using a silicone heat blanket.
This build uses the Auber SYL-2352P PID controller and a 2000 watt heating blanket, but you can adapt the approach for other controllers and blanket sizes.
⚠️ Safety Note: This project involves electricity. If you’re not confident in wiring electrical equipment, have a licensed electrician assist you.
How It Works
The PID controller uses feedback from a thermocouple to turn the heat blanket on and off through the solid state relay. This keeps the temperature at your target set point, typically 160–180°F for ski-building (vacuum compression) epoxy.
Top Only Heat: What to Know:
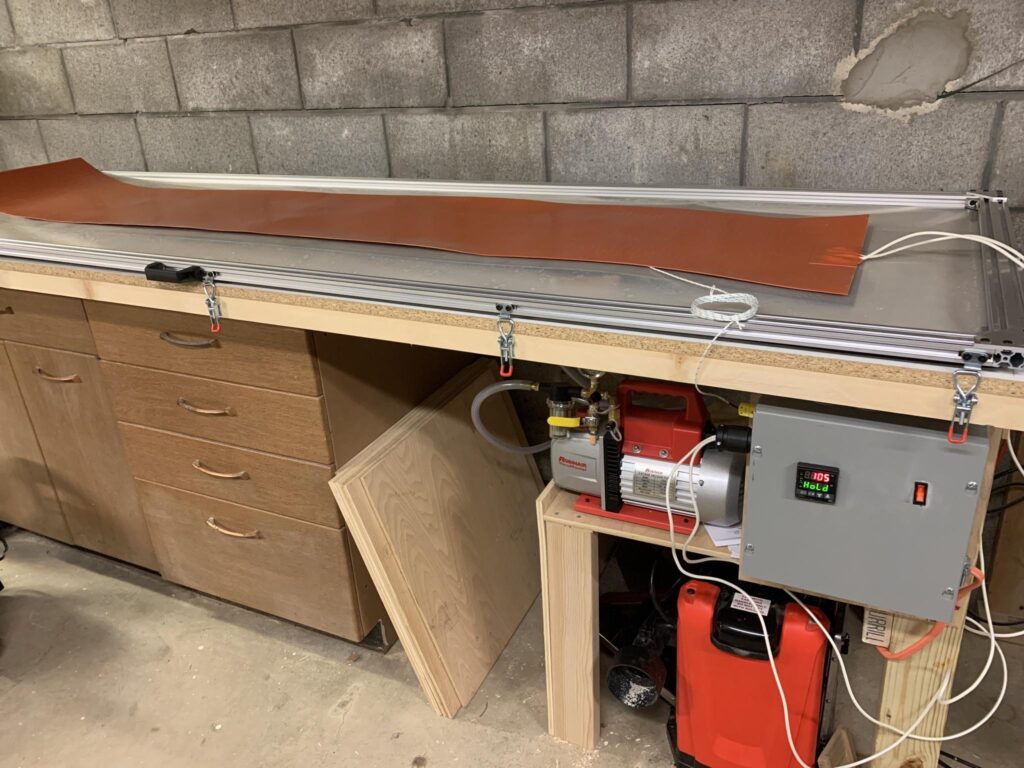
I use a top-only heating approach — in other words, my layup is only being heated from the top, not both the top and the bottom, while it’s curing. I do this to control costs and preserve vacuum integrity by minimizing wire passthroughs into the vacuum cavity.
Since the layup is heated only from above, a temperature gradient develops — the top layers are hotter than the bottom. This affects the camber profile of the ski: the final camber or rocker may differ slightly from what you set in the mold. The reason is that different materials in the ski expand and contract at different rates depending on their temperature, and temperature varies through the vertical section of the ski.
This effect can be compensated for with trial and error. In my situation, most builds require a few millimeters less camber (or a bit more rocker) than my target to end up where I want. This is highly dependent on the materials and layer stack in your ski.
If you want to avoid this variable entirely, install two heaters — one for the top and one for the bottom — to keep both sides of the layup at the same temperature during the cure.
Materials
Electronics
- Auber SYL-2352P PID controller (or similar)
- 40A solid state relay (SSR) with heatsink
- On/Off Switch
- AC/DC converter for the exhaust fan
- Silicone heat blanket (sized to your press, mine is 2kw 120 volts)
- K-type thermocouple (rated for your blanket temperature)
- Cooling fan (optional, for SSR and electronics cooling)
Enclosure & Wiring
- Steel or polycarbonate electrical box
- 10–18 gauge wire (correct gauge for your blanket’s power draw and small gauge for low voltage controls)
- Thermocouple & Heat Pad outlet connector
- Fused (or non-fused) disconnect.
- Breaker of the correct amperage.
- Ring or spade terminals for secure connections
- Terminal blocks (optional, for neat wiring)
Tools
- Drill and Jigsaw or rotary tool
- Wire strippers and crimpers
- Screwdrivers and pliers
- Multimeter
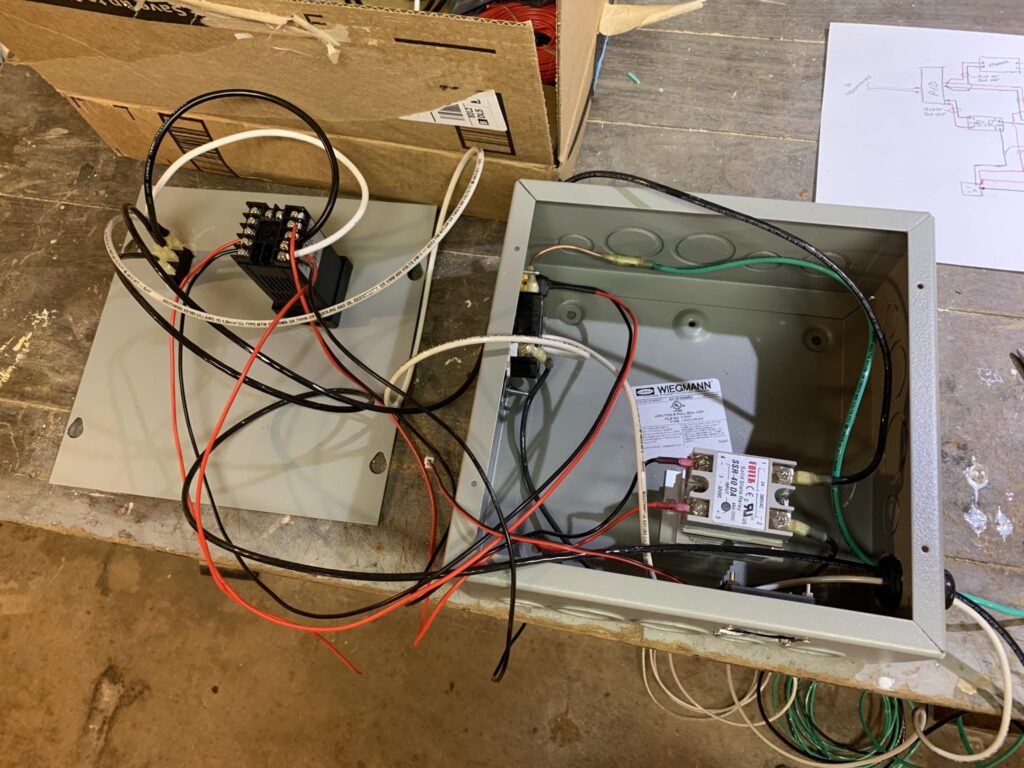
Step 1 – Prepare the Enclosure
Cut a panel opening for the PID controller so it mounts flush in the electrical box. Drill holes for:
- Power cord entry
- Output cord to the heat blanket
- Thermocouple lead
- Optional fan vent
Mount the SSR securely to the metal box or a heatsink for proper cooling.
Step 2 – Wire the System
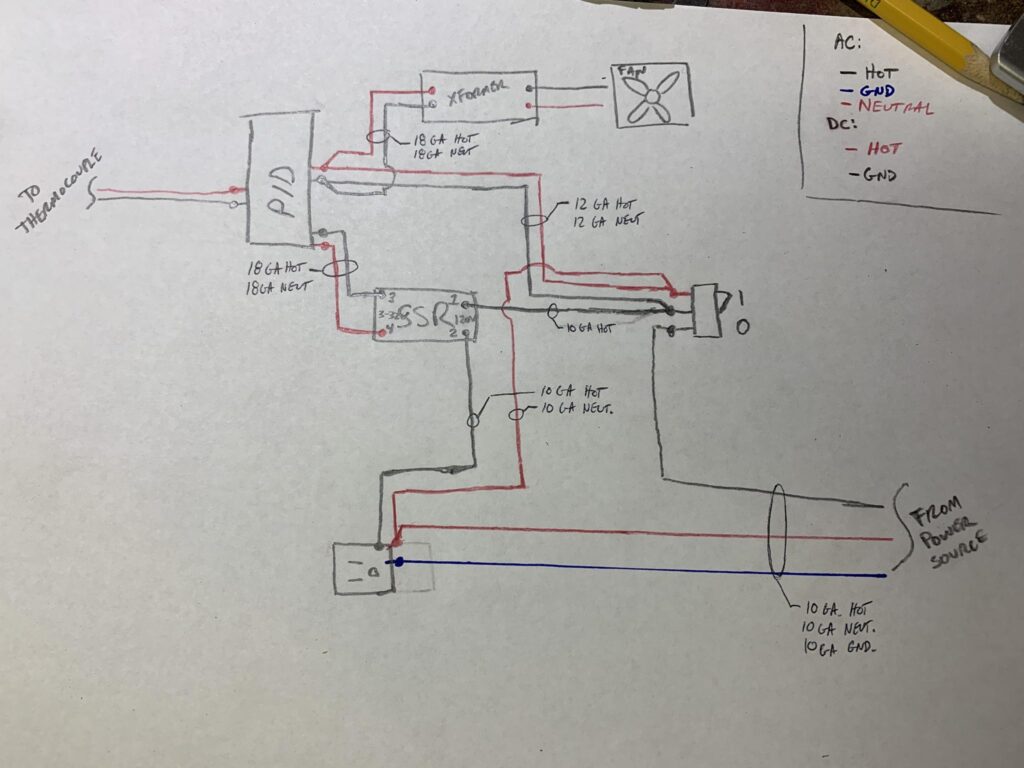
Follow the wiring schematic to connect:
- Mains power to the on/off switch and SSR input side.
- PID output to the SSR control terminals.
- SSR load terminals to the blanket’s hot leg.
- Thermocouple leads to the PID’s sensor input.
- Power to the PID controller and to the AC/DC converter for the exhaust fan
Step 3 – Test the Controller
Before connecting to the press:
- Power up the system.
- Set a low target temperature (e.g., 100°F) and verify the SSR switches the blanket on and off.
- Confirm the thermocouple reads accurately — warming it by hand should make the PID display rise.
Step 4 – Calibrate and Program
Set your target temperature based on your epoxy’s cure requirements (commonly 160–180°F, refer to your epoxy’s instructions). Allow the system to reach temperature and stabilize before starting your press cycle. The PID will maintain temperature automatically until you shut it down.
With this PID-controlled heating system, you’ll have precise temperature control for reliable epoxy cures.
